This post shows how to use web.config transformations and parameters in Release Management in Visual Studio Team Services.
The VSTS interface and tasks are constantly evolving, but this is correct as of 10th November 2017.
Deploy a web site to different environments (eg QA, Live) using VSTS using web.config transformations and parameters.
Assumptions:
Solution contains a web application in Visual Studio 2017
Visual Studio Team Services for source control, build and release management
Deploying to Azure Virtual Machine
Step 1 Add Configuration to the Solution
Web.config transforms
Right-click the solution and choose Configuration Manager. Add a new configuration named “QA”.
Then right-click the web.config & select “Add Config Transform”. This will create a file called “web.QA.config” nested under web.config.
Note that the nested files can causes issues (see https://github.com/Microsoft/vsts-tasks/issues/3507) so to remove the nesting, edit the project’s .csproj file and locate the section relating to web.QA.config …
In the parameters.xml file, if you want a value to be set for a particular environment, edit the “defaultvalue” to something like “#{myTestParam}#”. So in this case the parameter name myTestParam is enclosed within #{ and }#. This pattern is used in the Release pipeline.
Step 2 Setting up the Build
Assuming the solution is in source control, create a build definition in Visual Studio Team Services (see elsewhere for how to do this).
This method uses a “build once, deploy many” technique – it will build the solution using the general “release” configuration, ie. NOT the new QA configuration.
In the “Build Solution” task set the MSBuild Arguments as follows:
Note that TransformWebConfigEnabled is set to false – the transforms will be done in the Release.
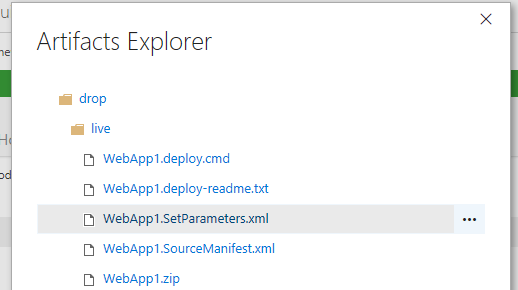
Queue a build and check that the correct artifacts are created. You should get a zip file for the web site and a “SetParameters.xml” file which will be named YourWebApp.SetParameters.xml:
Step 3 Setting up the Release
This assumes a deployment group has been set up (see elsewhere for how to do this). The target virtual machine is part of the deployment group.
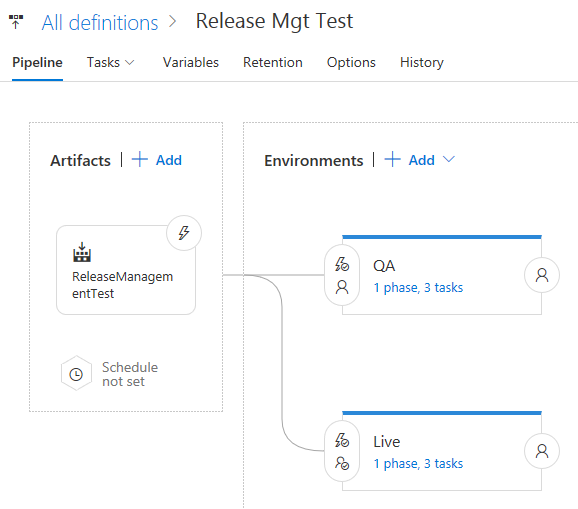
Create a release definition using the artifacts from the build:
The release pipeline
Create an environment called “QA” – this is important – it must match the name of the configuration in the Solution (but it is not case sensitive).
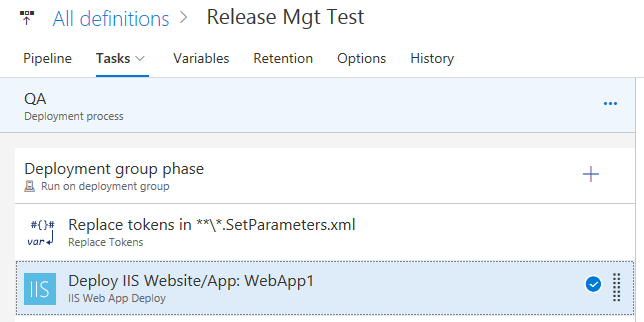
In the QA deployment process, create a “Deployment group phase” and add a task to replace tokens and a task to deploy IIS Web App:
Under the Advanced section, set the Token prefix and suffix (in this example we have a prefix of “#{” and suffix of “}#” without the quotes)
IIS Web App Deploy task:
In File Transforms & Variable Substitution Options, tick “XML transformation”. [By ticking the release process will look for a web.config transform file called web.EnvironmentName.config, in this case web.QA.config.] Note that if there is a file called web.Release.config then that transform will also be applied.
In Advanced Deployment Options, enter the path to the “SetParameters.xml” file in the artifacts folder (it will be named YourWebApp.SetParameters.xml)
Setting Environment Variables for the Release
While editing the release definition, click on the Variables tab and enter variables for the QA scope. Note that parameter names are case sensitive.
For example, if your parameters.xml contains configuration for an appSetting called MyTestParam like this:
Then in VSTS Release definition the variable should be set up with:
Name: MyTestParam

Value: Whatever value you want

Scope: QA
Note that the Name is a case sensitive match to the value of defaultvalue within #{}# in the parameters.xml file.
Adding a New Environment
To create a “Live” environment would involve the following steps:
In Visual Studio, create a new configuration called “Live” for your solution, create the web.live.config transform & ensure to remove the dependentUpon node in the .csproj file.
In VSTS,
edit the release definition and clone the QA environment and rename this copy to “Live” – important as the name must match the new configuration in your solution.
Create new values for the release variables for “Live” scope